How to setup multiple BSSIDs using DD-WRT
| Revision: | v8.0 (history) | |||
| Last update: | Mar 9, 2014 |

| 0 - 4 | You are out of luck. Your router will not do multiple (B)SSIDs. |
| 5 - 8 | Your router will do multiple SSIDs, but not multiple BSSIDs. |
| 9 and up | Your router will do multiple BSSIDs. Kudos! |
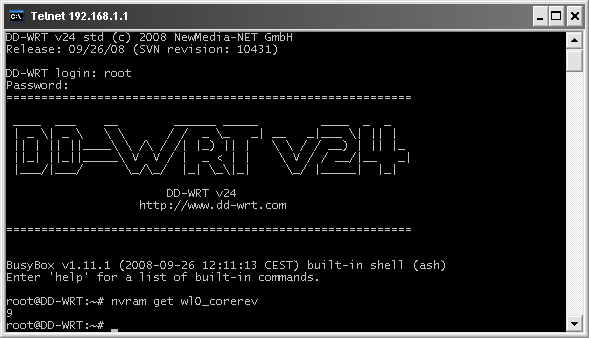
To close the telnet session, type "exit" at the prompt.
Which version of DD-WRT do I need?
For newer routers, check the Router Database on dd-wrt.com to see what the latest stable version is for your router.For older routers, either check the Router Database, or get one of EKO's TNG builds. You can find them here:
A higher number means it's a newer build. Always try the highest number first and if that gives problems, try a lower number. You will also notice there are several versions for each build. The most notably are the "VINT" and the "NEWD" branches. "VINT" stands for "Vintage" and you need that if you have a wl0_corerev smaller than 9. If you have a wl0_corerev of 9 or up, use one of the "NEWD" versions. "NEWD" stands for "New Driver". Within each of these two branches, there are more subversions like "mini", "mega", "voip". What this means exactly can be found elsewhere on the net. If you are unsure which file to get, just go for the "std" version. Chances are that's what you need anyway.
Flashing DD-WRT
You can also find many very good tutorials on the interwebs on how to flash a new version of DD-WRT to your router so I won't go into much detail here. A few things to remember though. First and foremost, if your router still has its original firmware and this is the first time you are going to flash dd-wrt, please check the Supported Devices list for any special instructions (which can be found under "Notes for running dd-wrt"). Sometimes you need to flash a special version first before you can flash any of the other versions. Another thing to remember is that it's best to reset the router to its default settings before and after you flash the new firmware. It's not always necessary but it rules out certain problems you might encounter when you don't.There are two ways to reset the router to its factory defaults. You can either telnet to your router and at the prompt type these two commands:
erase nvram
reboot
reboot
Or you can reset the router to its default settings using the 30/30/30/30 method (yes, I added an extra "30"):
- Remove all cables (except the power cable) from the router.
- Press and hold the reset button (at the back of the router) for 30 seconds.
- While keeping the reset button pressed, remove the power cable and wait another 30 seconds.
- Still while keeping the reset button pressed, reconnect the power cable and wait another 30 seconds.
- Finally, release the reset button and wait another 30 seconds.
- Reboot your router (by power cycling it)
Personally, I prefer the first method for resetting my modem. :)
Setting up Multiple (B)SSIDs
From this point onwards, I assume you already flashed the appropriate version of DD-WRT to your router. Now it's finally time to create a second (virtual) SSID.All existing HowTos I found, were creating the new virtual wireless interface as an "Unbridged" interface. And this is actually where it goes wrong. We are going to do something different. We are going to create a new bridge called "br1" and hook the new virtual wireless interface to this new bridge.
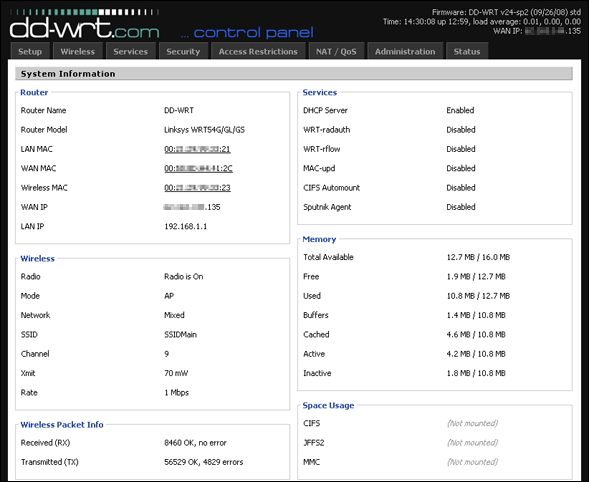
First point your webbrowser to your router's web interface by typing "http://" in your browser's address bar. If all is well, you will see something like this:
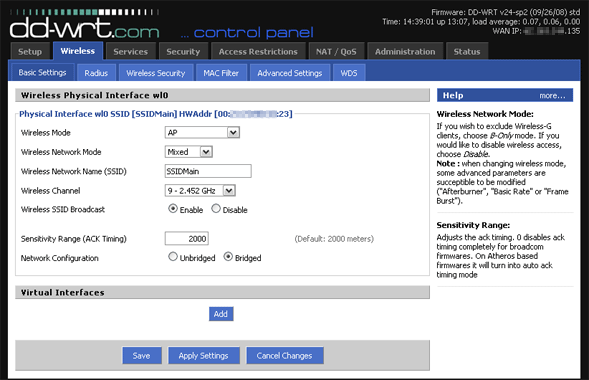
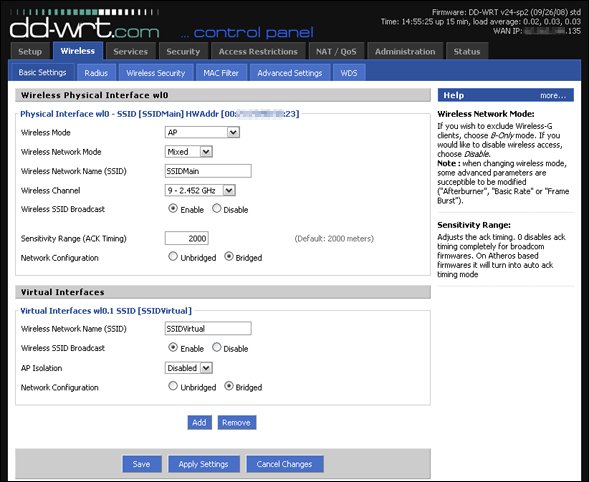
Now click the Wireless tab. A screen with your existing wireless interfaces will appear:
Click the button just below Virtual Interfaces and enter the following information for the new interface:
| Wireless Network Name (SSID) | Or whatever name you want to give this interface. | |
| Wireless SSID Broadcast | Enabled | If you don't want the SSID to be visible, choose Disabled here. |
| AP Isolation | Disabled | You can enable this if you don't want clients on this interface to talk to each other. |
| Network Configuration | Bridged | That's not a typo! Every other HowTo says you should choose UNbridged, but you should really choose Bridged here! |
Click the button. Your screen should look something like this:
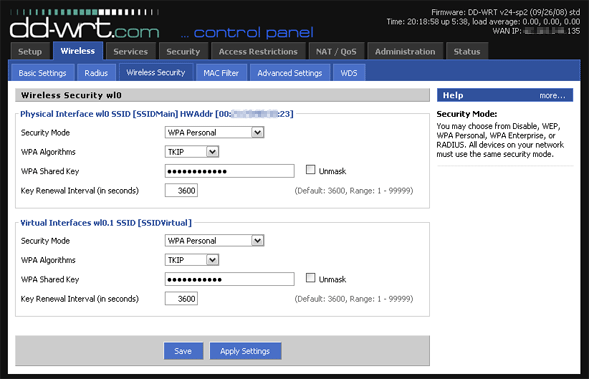
Now click the Wireless Security sub-tab. For each interface, choose the appropriate security mode and enter a key (if necessary). Click the button. Your screen will now look something like this:
Click the Services tab, and scroll down to the DNSMasq frame. In the "Additional DNSMasq Options" input box, enter the following:
interface=br1
dhcp-range=br1,,,,1440m
dhcp-range=br1,,,,1440m
Click the button.
This tells the router that (amongst other things) the new bridge will give connecting clients an IP address in the - range.
Now go to the Administration tab, sub-tab Commands. In the input box below Command Shell , enter the following:
if [ "`nvram get wan_proto`" = "pppoe" ]; then
wanif="`nvram get pppoe_ifname`"
else
wanif="`nvram get wan_ifname`"
fi
# Make sure br1 has access to the internet:
iptables -I INPUT -i br1 -m state --state NEW -j logaccept
iptables -I FORWARD -i br1 -o $wanif -m state --state NEW -j ACCEPT
# Keep the two wireless networks from talking to each other:
iptables -I FORWARD -i br0 -o br1 -j logdrop
iptables -I FORWARD -i br1 -o br0 -j logdrop
# Keep br1 from accessing the router:
iptables -I INPUT -i br1 -p tcp --dport telnet -j REJECT --reject-with tcp-reset
iptables -I INPUT -i br1 -p tcp --dport ssh -j REJECT --reject-with tcp-reset
iptables -I INPUT -i br1 -p tcp --dport www -j REJECT --reject-with tcp-reset
iptables -I INPUT -i br1 -p tcp --dport https -j REJECT --reject-with tcp-reset
iptables -t nat -I POSTROUTING -o `get_wanface` -j SNAT --to `nvram get wan_ipaddr`
Click the button.
In the same input box (which is now empty again), we need to enter a startup script to create the new bridge, move the virtual wireless interface to it, and setup the new interface's IP address. But for it all to work, we need to properly setup NAS. But how NAS needs to be setup depends on the security settings for each wireless interface. At the start of this HowTo, I asked you to enter the proper security settings for each interface. This information has been used to generate the code below. If you need different security settings, change it at the start of the HowTo and come back here.
Now copy and paste the code from the box above into the Command Shell input box.
Click the button.
Finally, click the Management sub-tab, scroll down and click the button.
Wait until your router has rebooted itself and you should now have two working (B)SSIDs!
If you can't connect to the virtual interface, wait 5 minutes and try again. Sometimes, for reason completely unknown to me, it takes a few minutes before the virtual interface actually starts working. If waiting doesn't help, then you probably have some left-over configuration settings that are messing with the virtual interface. Try resetting your router to its factory default (see the part about resetting to factory default under "Flashing DD-WRT" above) and try the HowTo again. Be aware though that resetting your router to factory default means you will loose all your settings like port forwarding rules, MAC cloning, etc. So write down all your settings before resetting your router.
Revision History
| v8.0 | Apparently this HowTo didn't work (properly) with newer routers. People were able to create multiple BSSIDs but the virtual wireless interfaces had no internet access. To solve this I've made some changes to the firewall script. | |||
| v7.0 | Some people who connected to the internet through PPPoE reported the HowTo did not work for them. I made a small change in the firewall script which should hopefully solve the problem. | |||
| v6.0 | I got myself a Linksys WRT310N and found out my HowTo did not result in working multiple BSSIDs on this router. After some experimenting I found out why and I have now corrected the HowTo so it works on more routers. | |||
| v5.0 | Newer EKO firmwares did not work with this HowTo because it created an IP conflict between interface br1 and wl0.1. This has been fixed and this HowTo should now also work with the newer firmware versions. | |||
| v4.1 | I actually reverted some of the changes I made in the previous revision of this HowTo because WEP still didn't work as it should. As it is now, I don't experience any problems with WEP at all, but if you do, please let me know. | |||
| v4.0 | If you set the security mode to WEP for one or both of the interfaces, the NAS settings didn't work causing the router to be unable to issue an IP address for the wireless interface. This has been fixed. | |||
| v3.0 | I removed the PPPoE tick box again since the WAN interface can actually be anything (and not either "vlan1" or "ppp0" as I assumed). This version of the HowTo creates code that should work with whatever your WAN interface's name is ("vlan1", "vlan2", "ppp0", etc.). | |||
| v2.0 | I assumed the WAN interface was always "vlan1" but when your router is setup as PPPoE, then the WAN interface is "ppp0". I added a tick box where you can specify wether or not you are using PPPoE. | |||
| v1.0 | Original Document |